If you are using the Elementor Loop Grid, you already know the power of pulling content into a clean, dynamic layout. But grids have one limitation: users often need to “mentally map” where those items actually are.
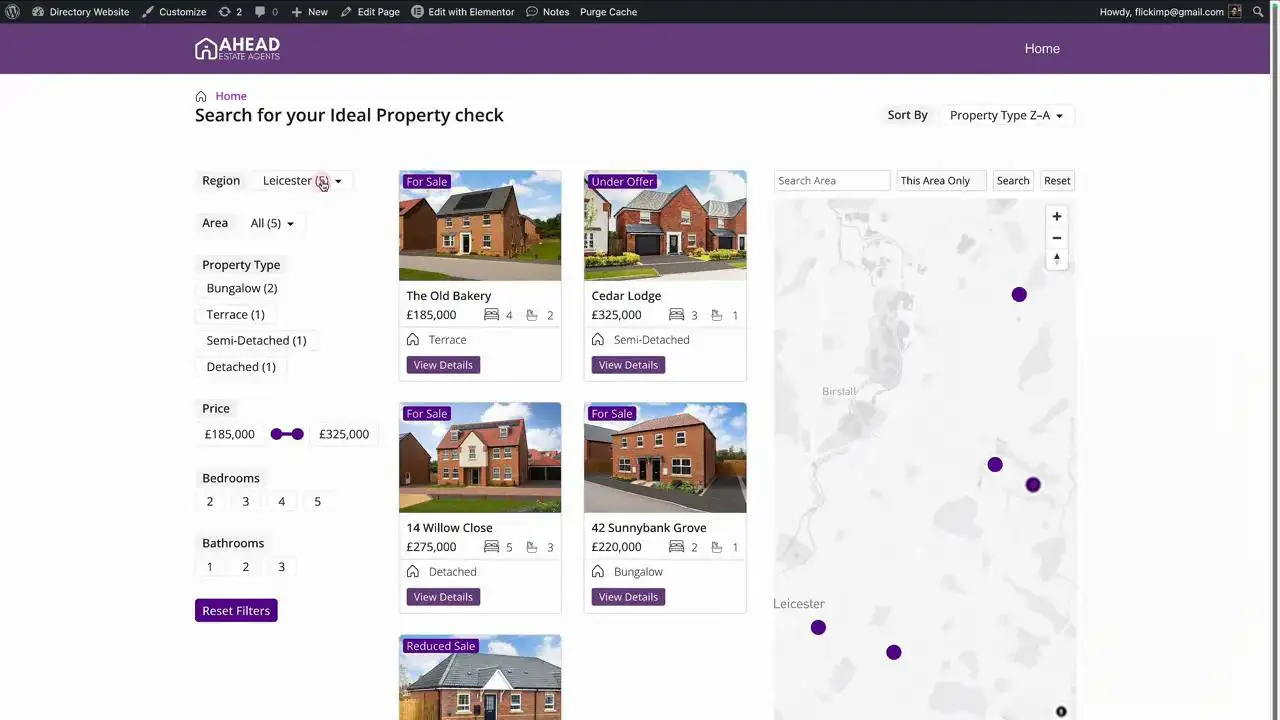
That’s where the Loop Map comes in. This professional-grade workflow allows you to place your Loop Grid items onto an interactive map with custom markers, pop-up cards, and direct links to your single post pages.
What the Loop Map Actually Does 🗺️✨
When configured correctly, the map acts as a functional extension of your data:
- Dynamic Markers: Pins are automatically generated from your posts (properties, venues, events, or listings).
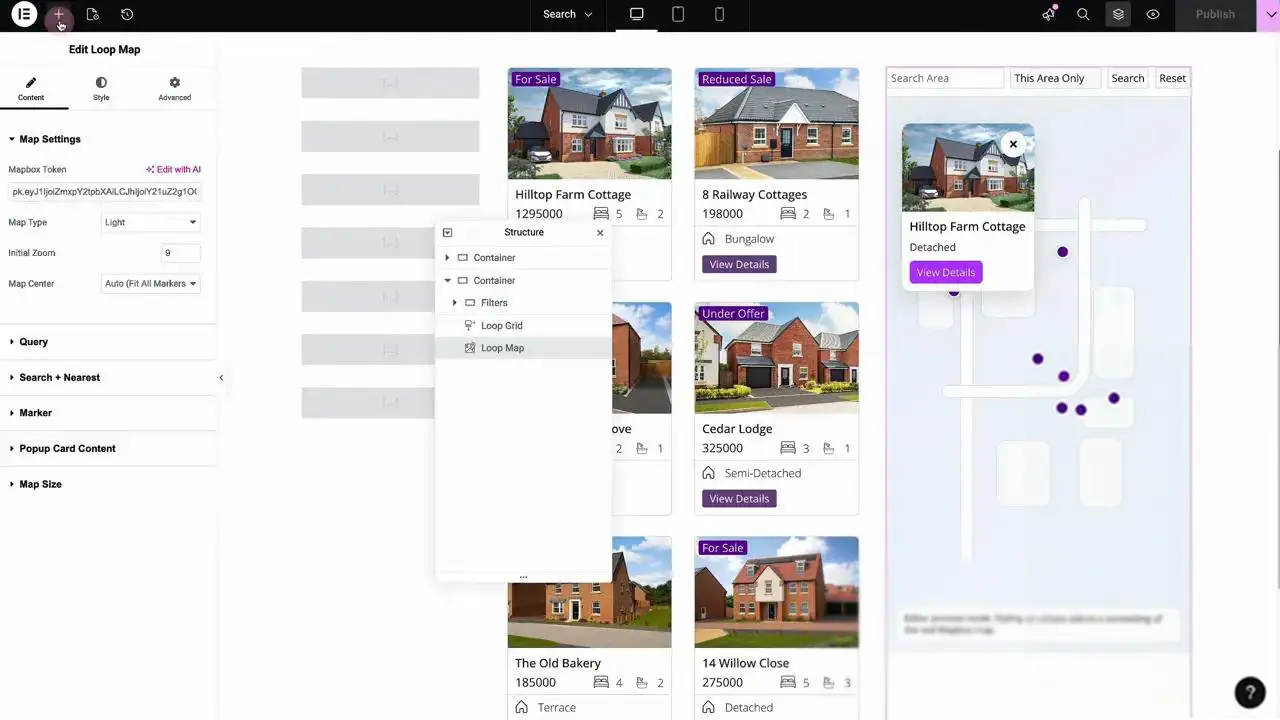
- Interactive Pop-ups: Clicking a marker opens a card featuring the post image and key custom fields.
- Synchronized Navigation: Clicking items can highlight and move the map to the related marker.
- Direct Links: “View Details” buttons send users straight to your single post template, reducing bounce rates.
- Smart Controls: Includes auto-fit logic that adjusts the zoom based on visible markers—perfect for filtered results.
The Requirements (Setup for Success) 🛡️
To get the Loop Map running smoothly the first time, you need two core components:
- A Location Custom Field: A field in your post type containing a postcode, zip code, or address.
- A Mapbox Token: Mapbox provides a generous free tier (typically up to 50,000 views).
The Logic: You store a postcode in your custom field. When the map loads, the snippet sends that data to Mapbox, which converts it into coordinates and places the marker with surgical precision. 🏗️📈
How to Install the Loop Map Widget 💎📦
Once you have the code snippet activated via Code Snippets, the “Loop Map” widget will appear directly inside your Elementor editor.
- Search for “Loop Map” in the Elementor sidebar.
- Drag it onto your page (next to or above your Loop Grid).
Add your Mapbox Token: Pro Tip: Tie your token to your specific URL in the Mapbox dashboard to ensure the map authorizes correctly on your live site.
Configuring the Query & Filters 🏎️💨
If you are using a filter system (like Filter Builder V5), the integration is seamless:
- Match the Query ID: Ensure the Loop Map Query ID matches your filter setup.
- Custom Field Key: Enter the exact key for your location field (e.g., postcode).
- Real-Time Updates: If a user searches for a specific area or applies a distance filter (e.g., “within 5 miles”), the map will automatically update to show only the relevant pins.
Markers & Pop-up Styling 🎨
You aren’t stuck with generic red pins. You can architect a map that fits your brand perfectly:
- Custom Pins: Choose between default styles, circles, or upload a Custom Image (like a house icon for real estate).
- Color Precision: Pick your brand colors. Note: If the marker defaults to turquoise, simply re-select your custom color to “lock” it in.
- Dynamic Pop-ups: Configure the pop-up card to show the featured image, title, and subtitles pulled from any custom field (like “Price” or “Number of Bedrooms”).
Beyond Properties: Versatile Use Cases 🌐
This isn’t just for real estate. Because it relies on standard custom fields, you can use it for:
- Events: Filter by date and see what’s happening nearby today.
- Directories: Map out local businesses or resources.
- Venues: Show location-based search results for weddings or meetings.
Building the “Directory” Architecture 🎯
If you’re looking for a step-by-step guide on building a full directory site—including advanced filter logic and the Loop Map—check out our Phase Three course content on the Web Squadron Elementor website course.
Ready to add a map to your grid? Activate the snippet and start building. 🚀💎

Huge thanks to Imran Siddiq - Web Squadron for architecting this tutorial!
❓FAQ: Loop Grid: Loop Map
Does the Loop Map widget only work with a Filter Builder?
No. While it integrates perfectly with filters, you can use it as a standalone “Grid + Map” layout for any location-based content.
What location data can I use?
The map accepts postcodes, zip codes, or full addresses. It converts these into longitude and latitude automatically.
Can I customize the look of the map itself?
Yes. Inside the widget settings, you can choose different Mapbox styles (Light, Dark, Satellite, etc.) and control the default zoom and positioning. 🛡️✨
How do the "View Details" links work?
You can enable a button within the pop-up card that dynamically links to the URL of the post, taking the user to your single post template.